


how money
MUCH COIN
Getting Started Mining.
Join a Pool. Much Wet!
Since we have established that solo mining is way harder to do and not worth it, we are going to go through this tutorial based on joining a pool. Below are the Dogecoin pools you can join. Some are big, some are small, you can test the water out and see which one you like best. Here is a cool graph on Doge pools: https://pools.rapidhash.net/
01
If you haven't already gotten your Dogecoin wallet or gone through the Getting Started Guide, please do so first, before doing this section. You'll need to have your wallet and an address setup before you can start mining. If you already have a wallet and addy set up, let's get mining!
You can mine with a PC or a Mac. PC's have a little more wiggle room for customization, so if you're going to go all out and build a rig, you're probably better off building it in PC, your wallet will thank you too. If you just want to check it out with your current computer or gaming computer like I first did, you can too. Let's dive in.
WARNING: Do not try mining on a laptop, you will fry it.
Each one of these pools will have its own fee (if there is one), and pool members. Some may have thousands of members, some may have hundreds. The more members, the faster the group will find blocks, the less members, the slower the new blocks will be found, but the less the block will have to be divided in shares.
But it is practically the same thing, bigger pools = smaller but faster payments. Smaller pools = bigger but slower payments.
Its more profitable if you join a smaller pool if your hash rates are less than 15 MH/s. We'll talk about hashrate in the Mining Terminology Guide.
Create a worker on the pool.
Ok so in order to start mining, you'll have to create a worker that you can mine with. This is really easy to do and only requires a user name and unique password. Make sure your password is a hard one, and make sure to keep it in a safe place. If you are using multiple computers, you should have a worker for each computer with different user/password.
02

Download Mining Software
In order to mine your Dogecoin you will need to download a mining software. Mining binaries are available for Windows, Linux, or OSX in AMD or NVIDIA. The most popular ones for Dogecoing GPU mining are CGminer 3.7.2 for AMD cards and CudaMiner for NVIDIA cards.
Download CGminer here:
Mac (download full pakcage so you don't have to compile)
Download CudaMiner here:
If you are on a mac and are uncomfortable with using command line, there is a great Mac mining softare called Asteroid you can use.
03
Setup .bat file
In order to launch CGMiner/CudaMiner with the right parameters, we need to make a .bat file with our info on it.
Open Notepad or any text editor you may have to make a new .bat file in the same folder your miner resides, call it anything you want my_new_bat_file.bat
Open the file and copy and paste the info pertaining to your particular miner (use one or the other):
./cgminer --scrypt -o PoolUrl -u UserName.WorkerName -p Password
./cudaminer.exe -o PoolUrl -O UserName.WorkerName:Password
Replace the info in orange with your pool info.
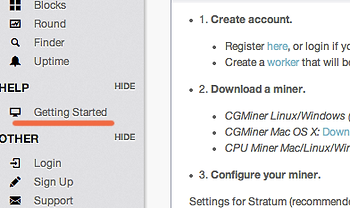
You can find the settings of your pool in the "Get Started" section of your pool nav. See below:
Replace "PoolUrl" with your poolurl, it should look something like this: stratum+tcp://awesome.pool.pm:3301
Replace "UserName.WorkerName" and "Password" with your actual username and password
The UserName is the user name you use to log in to the pool, the worker name is the name you gave your worker and then the password is the password you gave your worker. So it would look something like this:
Rockstar.Jimmy -p 1a2b3c!!#$
Rockstar.Jimmy:1a2b3c!!#$
So all together it should look something like this, depending on what miner you are using:
./cgminer --scrypt -o stratum+tcp://awesome.pool.pm:3301 -u Rockstar.Jimmy -p 1a2b3c!!#$
./cudaminer.exe -o stratum+tcp://awesome.pool.pm:3301 -O Rockstar.Jimmy:1a2b3c!!#$
Find out what GPU you have. On a PC you can do this by going to Start/Computer/System Properties/Device Manager/Display Adapters.
Finding your GPU on a Mac - Click on Apple Logo/About This Mac/More Info (you will see your card on that screen undr graphics)
Then go to this page to add your GPU card's configuration at the end of the string GPU Configuration.
Say your GPU card is a R9 280X, 100363VXSR, your configuration will be as follows:
Add a space after your password and copy and paste your configuration after the string you copied and pasted and added your info to, so mine for instance would look like this:
./cgminer --scrypt -o stratum+tcp://awesome.pool.pm:3301 -u Rockstar.Jimmy -p 1a2b3c!!#$ -I 13 --thread-concurrency 8192
Click Save As and save the file in the same folder that your CGMiner application is in.
*Make sure you save it as a .bat file and then close the file.
***If you are running CGminer, before you run your .bat file, delete the example.conf file from the folder where your miner is.
To run the file and start mining, double click your .dat file (a command terminal window should pop up and you should hear your cards kicking on).
Advanced settings page coming soon!
You're all set! Happy Mining!
05b

Big props to u/Beverage , DJThrottle, and TheGreedSeed for sharing awesome info.
Setup .conf file
Ok, now that you have downloaded your miner, go ahead and open the folder where the miner is located in. In there, you will see a file called example.conf, double click it to open. If you don't see one, don't worry, just open up Notepad or any text editor to get started.
Once you have it open it should look something like this:
Since most of the configurations won't be correct for your card, let's start from scratch. The rest of the info you see on there are advance settings. We'll go through advanced settings on another tutorial coming soon.
Important: We also need to add a line to tell it to use the proper method for mining dogecoin. “scrypt” : true, (Delete everything and copy and paste this if you want):
{
"pools" : [
{
"url" : "poolurl",
"user" : "user1",
"pass" : "pass1"
}
],
"scrypt" : true,"kernel-path" : "/usr/local/bin"
}
Next we will be editing what's in orange.
The first thing we'll edit is the poolurl. Once you have joined a pool, login and click on the Get Started link on the left Nav. Looks something like this:
The url will most likely start with the word startum and look something like this: stratum+tcp://awesome.pool.pm:3301
Next, you will put in your worker name which will look like this: weblogin.workername
Then, you will put in your password which will look like this: wokerpassword
When you're done, it should look something like this but of course with your info:
{
"pools" : [
{
"url" : "stratum+tcp://awesome.pool.pm:3301",
"user" : "weblogin.workername",
"pass" : "wokerpassword"
}
],
"scrypt" : true,"kernel-path" : "/usr/local/bin"
}
Save the file as and name it cgminer.conf or if you're using cuda name it cudaminer.conf and save it in the same folder as your miner.
Double click the .exe file to run and your GPU's should power up!
04a


For this next step, there are two ways you can do it. Either way is fine, but if you use the .bat method as shown in #04b and are running CGminer, remember to remove the example.conf file and run from the .bat file.